Back in January 2016 Seth Coussens published a fantastic 3 part blog on how to dynamically show or hide properties on Work Item forms within the Cireson portal.
- https://sethcoussens.com/2016/01/24/cireson-portal-dynamic-forms-by-template-id/
- https://sethcoussens.com/2016/01/24/cireson-portal-dynamic-forms-by-template-id-part-2/
- https://sethcoussens.com/2016/01/24/cireson-portal-dynamic-forms-by-template-id-part-3/
These blog articles are great for showing or hiding properties that different analysts need to see or, as the case may be, don’t need to see. These are great for organisations that have more than just the IT department using their SCSM instance. (HR, Facilities, Legal, etc.)
Since the release of v9.x of the Cireson Portal it is now possible to edit Configuration Items just like Work Items. You are even able to sync custom Configuration Items that you may have created for your requirements.
Now that it’s possible to edit Configuration Items some people will start to want to customise the form dynamically as well as being able to create custom form layouts.
So I’m going to attempt to explain how to achieve the solution that Seth created back in 2016 and modify it for Configuration items.
PART 1: CIRESON PORTAL CONFIGURATION ITEM FORM CUSTOMISATION
Just like the previous blog posts for work items, we’ll start by discussing what happens in the portal in terms of the Configuration item forms. In it’s most basic terms, we are using a template that is coded in JSON and then using that to determine the look, feel, and data bindings of the Configuration Item form in the portal.
Looking a little deeper into the process, we are defining in the template the variable we wish to bind to, and the type of control that we want to use to display that data. In order to accomplish this, we bring in all of the Configuration Item properties by making a call to the SCSM SDK when we load the form. We then look at the data model that is returned and bind the form to the data model using the template, and thus the various controls we defined.
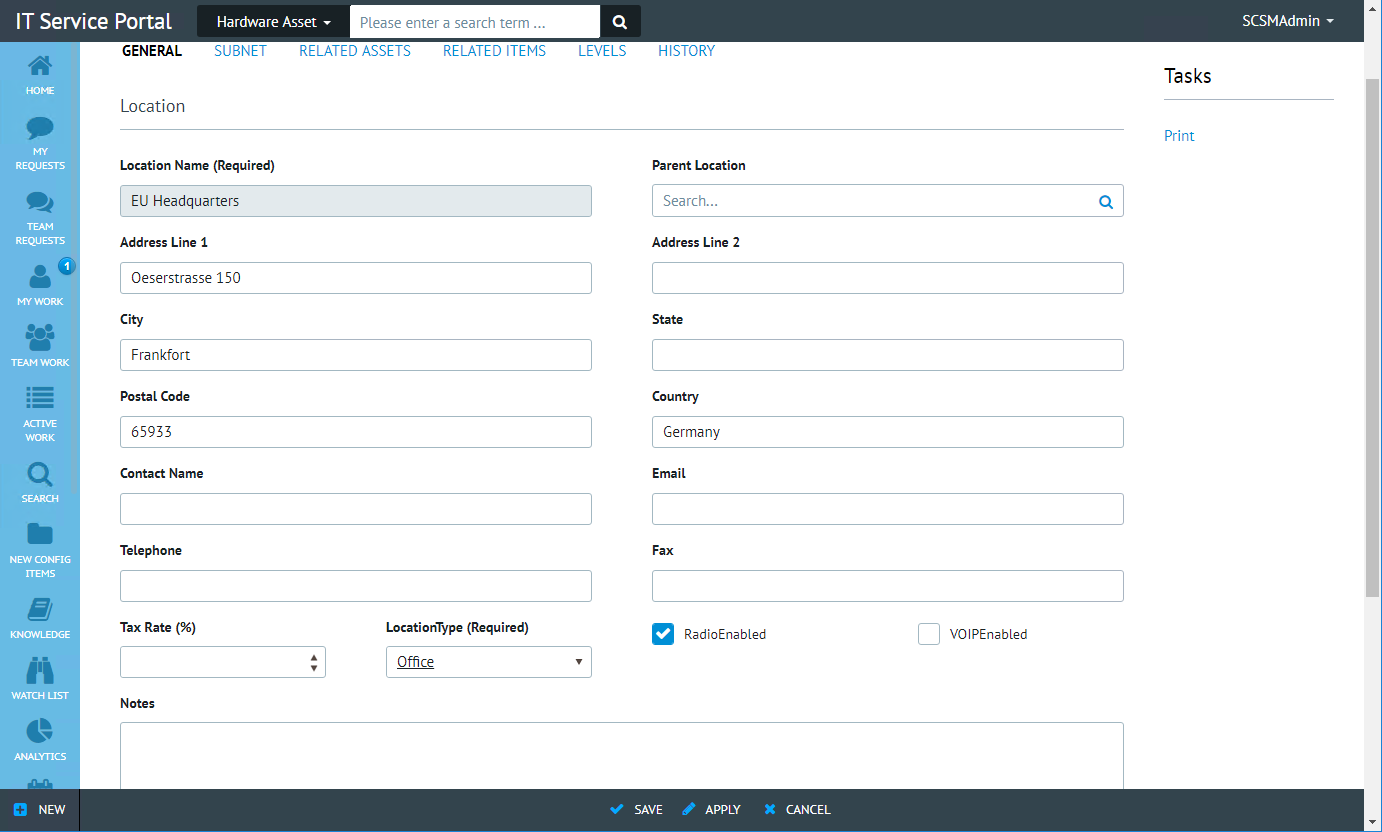
In this blog post series we are going to pick a Configuration Item that we can customise together. I’ve chosen the Location Configuration Item that exists within the Cireson Asset Management solution as I had a customer ask for this specifically and why not use a real world example right?
Within the SCSM authoring tool I extended the Location CI class with 3 new properties:
- Location Type – Enumeration List.
A way to track if a location is a State, Building, Room or Data Center Row. - VOIP Enabled – Boolean.
A property to indicate if there is a VOIP phone connection at the location. - Radio Enabled – Boolean.
A property to indicate if there is a shortwave radio communication at the location.
(This is very specific to this particular customer so not something lots of people would use but a good real world example.)
These new properties show up in the console form within the Extensions tab of the CI like so:

However, within the Cireson portal the extensions tab does not show. However, if we use the developer tools in the browser (F12) we can see that the extensions are there in the data model by opening the browser console and typing pageForm.viewModel and then expanding the result.
NOTE: Make sure pageForm.viewModel is case specific.

Now we know that the data exists in the model and is available to the browser, we just need to know how to display it in the form. This is where the information above becomes important. We are going to modify the Configuration Item form template so that the portal knows how and where to display the custom data properties.
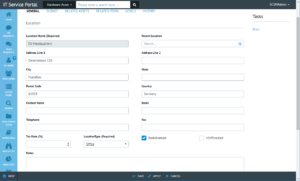
In this example we are going to add the three new properties to the main form of the Location Configuration Item.
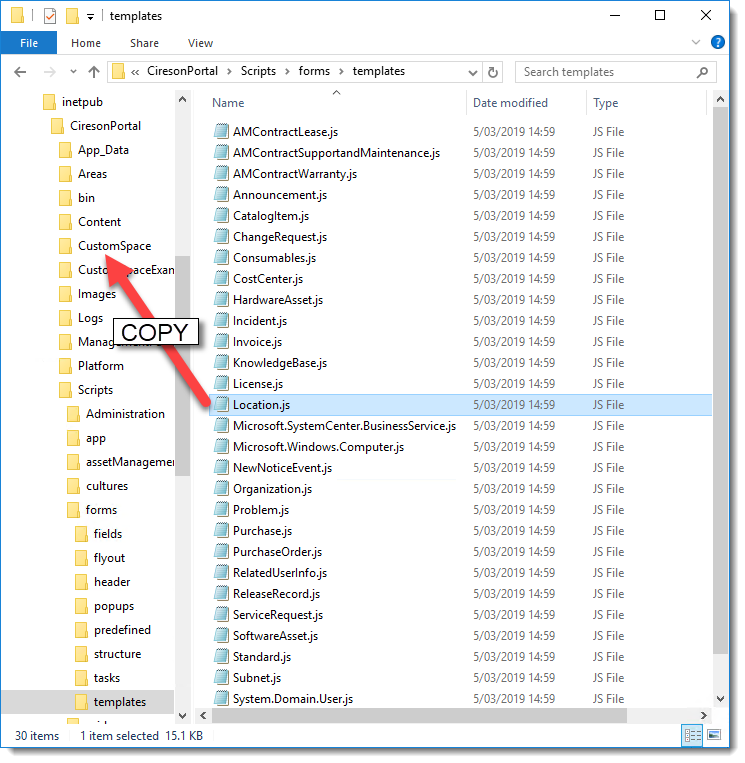
STEP 1:
Copy the Location.js template from the CiresonPortal\Scripts\Forms\Templates folder to the CiresonPortal\CustomSpace folder.
STEP 2:
We then need to edit the template. This can be done in any text editor.
NOTE: Remember to open your text editor as an administrator so you have rights to save the file in the correct location.

If you look through the file, the structure is fairly easy to identify with a little help from the below KB article which can be found here for Cireson portal customers:
https://support.cireson.com/KnowledgeBase/View/51#/
The above article goes in to detail about the structure of the JSON form layout but it is a long document that goes in to a lot of detail. The basics we need to know about the form structure are:
- Form name (default for the default form) [object]
- Tablist (each object in this array constitutes a tab)
- Name (name of the tab)
- Content (content of the tab)
- CustomFieldGroupList (contains the header and the rows)
- Name (header of the subsection)
- Rows (defines what fields will show in each row)
- ColumnFieldList (contains the definition for each column item)
- Datatype (defines each individual form control, this is the key piece that will display our properties)
- ColumnFieldList (contains the definition for each column item)
- CustomFieldGroupList (contains the header and the rows)
- Tablist (each object in this array constitutes a tab)
There is no real limit on the number of rows you can have on a form, but the columns are generally broken up into four separate columns per page. There are a number of datatypes you can use, refer to the above KB Article for more detail.
STEP 3:
Find a place on the form that we wish to show the new properties.
On the locations form, there is a Tax Rate field that takes up half of the page and this seems a little excessive considering this value is never going to exceed double digits. So it is a good choice to place these other properties on the same line as the tax rate.

In the Location.js file, we can see that the Tax Rate has a “Spacer” to bulk out the rest of the form.

We can replace this with our new properties.
STEP 4:
Enter the datatypes in the right syntax to add the properties we need.
In this example we are going to add one enumeration list and two Boolean properties. Normally I’d just cut and paste a similar property control from elsewhere in the JSON file and replace the values but in the Location.js file there are no Enumeration or Boolean values.
Here are the 3 lines I used in this example:
{ DataType: “Enum”, PropertyDisplayName: “LocationType”, PropertyName: “LocationType”, EnumId: ‘190ea39d-58df-cc3a-b9df-608c64d24349’, Required: true },
{ DataType: “Boolean”, PropertyDisplayName: “RadioEnabled”, PropertyName: “RadioEnabled”, Required: false, Inline: true },
{ DataType: “Boolean”, PropertyDisplayName: “VOIPEnabled”, PropertyName: “VOIPEnabled”, Required: false, Inline: true }
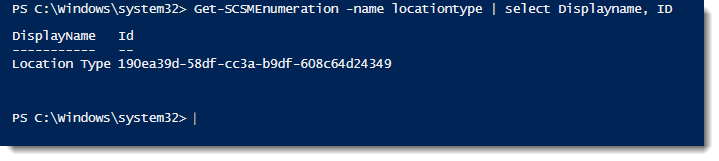
I’ve highlighted the EnumId as this is the unique enumeration ID for our enumeration list that we created in the authoring tool. This ID, or the ID for any Enumeration property, needs to be found.
STEP 5:
Find and enter the unique enumeration ID for our enumeration list.
(Of course if your extension(s) are not of an enumeration type, then you can skip this step)
There are 2 ways we can do this:
- PowerShell:
Using PowerShell we can use the command Get-SCSMEnumeration to search for the enumeration list we created. The following example uses the Name property to search for the name I gave the enumeration and then Select the Displayname and ID.
-
Get-SCSMEnumeration -name locationtype | select Displayname, id
Gives us a result like this:
- Browser:
Remember back at the start of this blog we opened a browser to the Cireson Portal then ran a command on the browser console to load the pageForm.viewModel?
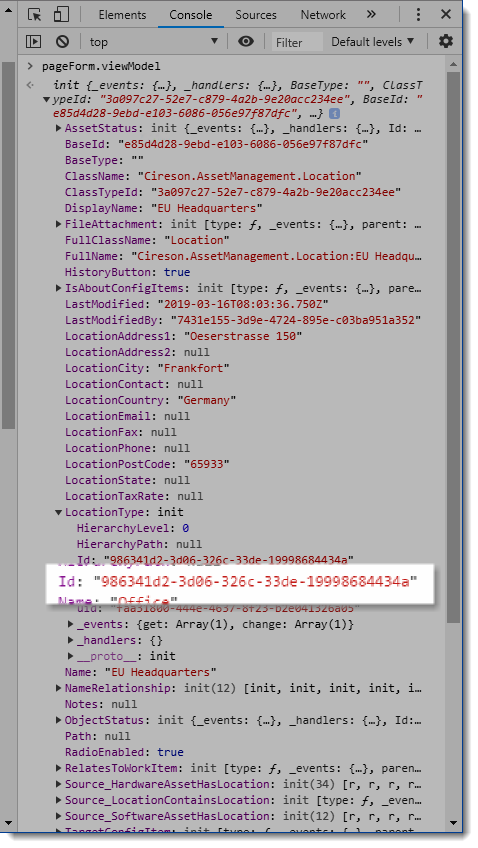
There it is!
Take the Enumeration ID and replace it with the ID in the enumeration example above.
STEP 6:
Refresh your browser!
That’s it. The form should now show the new properties on the form.
In my next post I will go in to how we can change these forms to be dynamic based on a value that might exist on one of the properties.