
We all love Microsoft’s System Center Configuration Manager and the vast majority of the industry loves it too. As Microsoft have recently announced over 50Million end points are now covered by just the latest current branch build (1610) https://blogs.technet.microsoft.com/enterprisemobility/2016/11/18/configmgr-current-branch-surpasses-50m-managed-devices/?Ocid=C+E%20Social%20FY17_Social_TW_MSFTMobility_20161128_685262993
The amount of data points that are returned from the ConfigMgr client is huge and can be exceptionally useful when diagnosing issues or tracking down what is deployed in an organization.
However, out of the box, the data is limited to what Microsoft deem necessary. While this is fine for much of the time every now and then there is a requirement to find more or different information to track things that are not in the standard hardware inventory report.
A great example that was asked for recently is Monitors.
Some organizations want to be able to track monitors with their PC’s and therefore their locations etc.
What many people do not realise is that a monitors cable (even VGA) passes very basic information back to the PC. This data can contain a bunch of data that is relevant to the monitor such as:
- Manufacturer
- Model
- Serial Number
- Etc.
This data is an industry standard called Extended Display Identification Data (EDID). This data is in a consistent format so this allows us to be able to retrieve this data in a consistent way.
Once we retrieve the data we can use it to identify what Monitor is currently plugged in. All we then have to do is get the Configuration Manager client to return the data as part of the standard hardware inventory cycle.
Step 1: Storing the EDID Data Somewhere Locally
This step takes the EDID data and places it in to a location that we can simply retrieve via the ConfigMgr client.
To achieve this, we need to get the client to interrogate the monitor for the EDID information then save the data to an easy to retrieve location, such as the WMI of the local machine.
To do this, we use PowerShell.
Here is the code you will need:
Test this script before you use it in prod. The script is provided as is and is not supported. (The usual drill)
# Reads the 4 bytes following $index from $array then returns them as an integer interpreted in little endian
function Get-LittleEndianInt($array, $index) {# Create a new temporary array to reverse the endianness in
$temp = @(0) * 4
[Array]::Copy($array, $index, $temp, 0, 4)
[Array]::Reverse($temp)# Then convert the byte data to an integer
[System.BitConverter]::ToInt32($temp, 0)
}# Creates a new class in WMI to store our data including fields for each of the data points that we can return
function Create-Wmi-Class() {
$newClass = New-Object System.Management.ManagementClass(“root\cimv2”, [String]::Empty, $null);
$newClass[“__CLASS”] = “MonitorDetails”;
$newClass.Qualifiers.Add(“Static”, $true)
$newClass.Properties.Add(“DeviceID”, [System.Management.CimType]::String, $false)
$newClass.Properties[“DeviceID”].Qualifiers.Add(“key”, $true)
$newClass.Properties[“DeviceID”].Qualifiers.Add(“read”, $true)
$newClass.Properties.Add(“ManufacturingYear”, [System.Management.CimType]::UInt32, $false)
$newClass.Properties[“ManufacturingYear”].Qualifiers.Add(“read”, $true)
$newClass.Properties.Add(“ManufacturingWeek”, [System.Management.CimType]::UInt32, $false)
$newClass.Properties[“ManufacturingWeek”].Qualifiers.Add(“read”, $true)
$newClass.Properties.Add(“DiagonalSize”, [System.Management.CimType]::UInt32, $false)
$newClass.Properties[“DiagonalSize”].Qualifiers.Add(“read”, $true)
$newClass.Properties[“DiagonalSize”].Qualifiers.Add(“Description”, “Diagonal size of the monitor in inches”)
$newClass.Properties.Add(“Manufacturer”, [System.Management.CimType]::String, $false)
$newClass.Properties[“Manufacturer”].Qualifiers.Add(“read”, $true)
$newClass.Properties.Add(“Name”, [System.Management.CimType]::String, $false)
$newClass.Properties[“Name”].Qualifiers.Add(“read”, $true)
$newClass.Properties.Add(“SerialNumber”, [System.Management.CimType]::String, $false)
$newClass.Properties[“SerialNumber”].Qualifiers.Add(“read”, $true)
$newClass.Put()
}# Check whether we already created our custom WMI class on this PC, if not, create it
[void](Get-WmiObject MonitorDetails -ErrorAction SilentlyContinue -ErrorVariable wmiclasserror)# If the wmiClassError is returned then assume that the WMI class does not exist yet and try to create a WMI class to hold the Monitor info
# If creating the WMI class fails, exit with error code 1
if ($wmiclasserror) {
try { Create-Wmi-Class }
catch {
“Could not create WMI class”
Exit 1
}
}# Iterate through the monitors in Device Manager
$monitorInfo = @() #Empty array
Get-WmiObject Win32_PnPEntity -Filter “Service=’monitor'” | foreach-object { $k=0 } {
$mi = @{}
$mi.Caption = $_.Caption
$mi.DeviceID = $_.DeviceID# Then look up its data in the registry
$path = “HKLM:\SYSTEM\CurrentControlSet\Enum\” + $_.DeviceID + “\Device Parameters”
$edid = (Get-ItemProperty $path EDID -ErrorAction SilentlyContinue).EDID# Some monitors, especially those attached to VMs either don’t have a Device Parameters key or an EDID value. Skip these
if ($edid -ne $null) {# Collect the information from the EDID array in a hashtable
$mi.Manufacturer += [char](64 + [Int32]($edid[8] / 4))
$mi.Manufacturer += [char](64 + [Int32]($edid[8] % 4) * 8 + [Int32]($edid[9] / 32))
$mi.Manufacturer += [char](64 + [Int32]($edid[9] % 32))
$mi.ManufacturingWeek = $edid[16]
$mi.ManufacturingYear = $edid[17] + 1990
$mi.HorizontalSize = $edid[21]
$mi.VerticalSize = $edid[22]
$mi.DiagonalSize = [Math]::Round([Math]::Sqrt($mi.HorizontalSize*$mi.HorizontalSize + $mi.VerticalSize*$mi.VerticalSize) / 2.54)# Walk through the four descriptor fields
for ($i = 54; $i -lt 109; $i += 18) {# Check if one of the descriptor fields is either the serial number or the monitor name
# If yes, extract the 13 bytes that contain the text and append them into a string
if ((Get-LittleEndianInt $edid $i) -eq 0xff) {
for ($j = $i+5; $edid[$j] -ne 10 -and $j -lt $i+18; $j++) { $mi.SerialNumber += [char]$edid[$j] }
}
if ((Get-LittleEndianInt $edid $i) -eq 0xfc) {
for ($j = $i+5; $edid[$j] -ne 10 -and $j -lt $i+18; $j++) { $mi.Name += [char]$edid[$j] }
}
}# If the horizontal size of this monitor is zero, it’s a purely virtual one (i.e. RDP only) and shouldn’t be stored
if ($mi.HorizontalSize -ne 0) {
$monitorInfo += $mi
}
}
}#$monitorInfo
# Clear WMI
Get-WmiObject MonitorDetails | Remove-WmiObject# And store the data in WMI
$monitorInfo | % { $i=0 } {
[void](Set-WmiInstance -Path \\.\root\cimv2:MonitorDetails -Arguments @{DeviceID=$_.DeviceID; ManufacturingYear=$_.ManufacturingYear; `
ManufacturingWeek=$_.ManufacturingWeek; DiagonalSize=$_.DiagonalSize; Manufacturer=$_.Manufacturer; Name=$_.Name; SerialNumber=$_.SerialNumber})#”Set-WmiInstance -Path \\.\root\cimv2:MonitorDetails -Arguments @{{DeviceID=`”{0}`”; ManufacturingYear={1}; ManufacturingWeek={2}; DiagonalSize={3}; Manufacturer=`”{4}`”; Name=`”{5}`”; SerialNumber=`”{6}`”}}” -f $_.DeviceID, $_.ManufacturingYear, $_.ManufacturingWeek, $_.DiagonalSize, $_.Manufacturer, $_.Name, $_.SerialNumber
$i++
}
The script needs to run on each PC on a regular interval to keep the data up-to-date. This ensures that if a monitor gets added or removed from a PC then the information is updated on a regular basis. Save the PowerShell script to a location that can be used by SCCM as the source location of a package. This location will be referenced as the Source Location for the remainder of this procedure.
| Open the System Center 2012 Configuration Manager console | |
| Select the Software Library workspace | |
| Expand the Application Management node and select the Packages node | 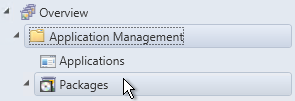 |
| Select the subfolder where the package will be created, right click and select Create Package from the drop down list | 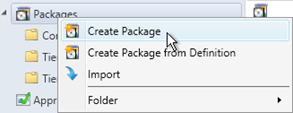 |
| Enter the following information:
Name: Monitor Details Gather Description: Extract the monitor EDID information from the client and store the data in WMI ready for collection by SCCM Version: 1.0 Click the checkbox labelled The package contains source files and click Browse |
 |
| Enter the UNC path to the Source Location folder created earlier in this procedure.
Click OK Once back on the package screen, click Next |
 |
| Select Standard Program and click Next | 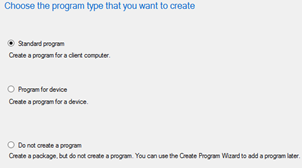 |
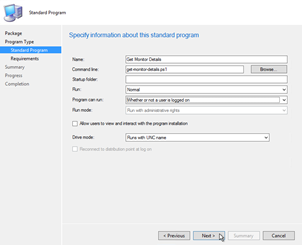
| Enter the following information:
Name: Get Monitor Details Command Line: get-monitor-details.ps1 Run: Normal Programs can run: Whether or not a user is logged on Click Next |
 |
| Leave all settings as default and click Next | 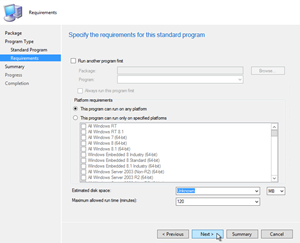 |
Confirm the settings and click Next to create the package
When the package creation is completed, click Close
| Within the console, right click on the package and select Distribute Content from the drop down list | 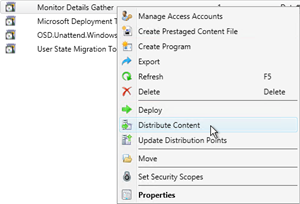 |
| Click Next | 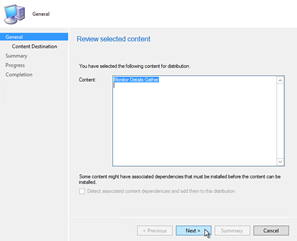 |
| Click Add and select Distribution Point from the drop down list | 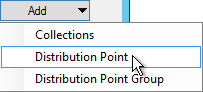 |
| Select the distribution points that require the content and click OK | 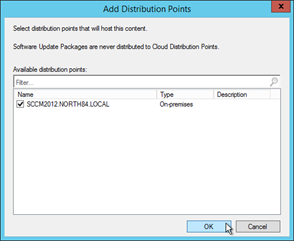 |
| Once all distribution points have been added, click Next | |
| Confirm all the settings and click Next | 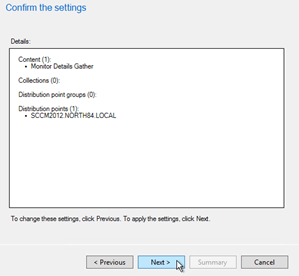 |
| When the Distribute Content Wizard is completed, click Close | |
Once the package is created we need to deploy it out on to run on a regular schedule on clients. The script does need to be run often as the monitors will move from PC to PC over time. How frequently is up to each organization and what they are trying to achieve.
To setup a deployment:
| Within the console, right click on the package and select Deploy from the drop down list |  |
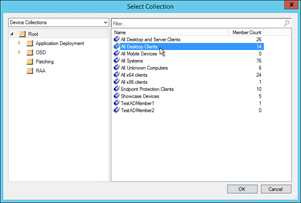
| On the label collection label click the Browse button | |
| Select the collection that the script will be deployed to and click OK.
On the previous screen, click Next |
 |
| Confirm that the content has been distributed to a distribution point and click Next |  |
| Select Required as the installation type and click Next |  |
| On the schedule wizard screen, click New | 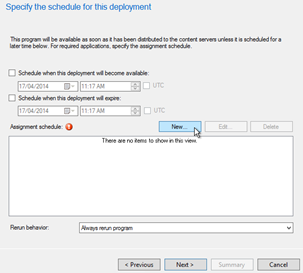 |
| Click the Schedule button | 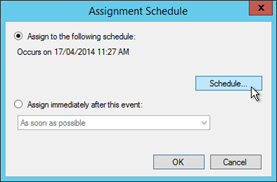 |
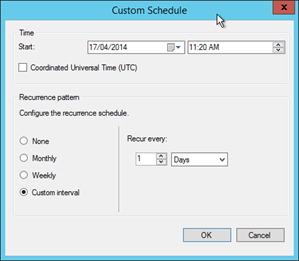
| Select the start time for when the script will run on the workstations.
Select a custom interval and set this schedule to recur every 1 days. Click OK. |
 |
| Click OK | 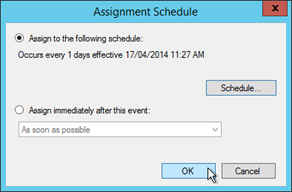 |
| Click Next | 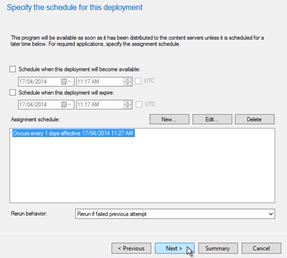 |
| Leave all settings as default and click Next | 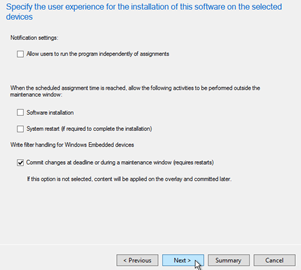 |
| Leave all settings as default and click Next | 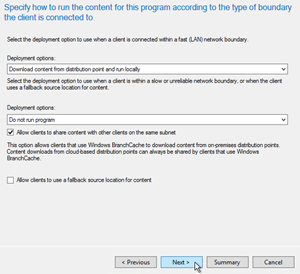 |
| Confirm the settings and click Next to create the package |  |
| When the Deploy software wizard is completed, click Close | |
Step 2: Retrieve the WMI Data via ConfigMgr
Now that we have the data stored in the WMI we need to get the ConfigMgr client to return the data next time it does a Hardware Inventory of the clients.
To ensure it is possible to read the correct fields within ConfigMgr the WMI class needs to exist on at least one PC that you have access to.
Select a PC to run the script on and execute the PS1 file.
This PC will be used later to query the class that will allow System Center 2012 Configuration Manager to collect inventory from all other workstations.
| Select the Administration workspace | |
| Select the Client Settings node |  |
| Select the Default Client Settings item, OR a client settings item that affects all workstation clientsRight click and select Properties |
 |
| Select Hardware Inventory from the settings list | 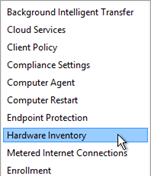 |
| Click Set Classes | 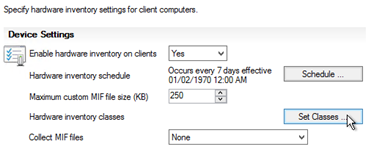 |
| Click Add | 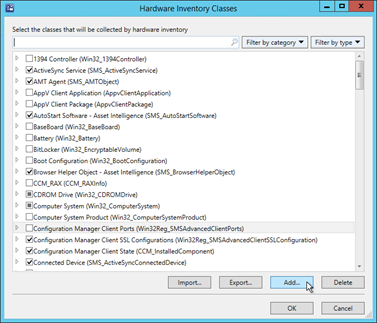 |
| Click Connect | 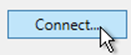 |
| Enter the Computer name that the script was run on earlier in this procedure and click Connect | 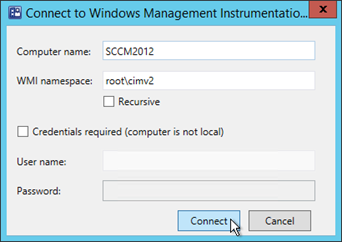 |
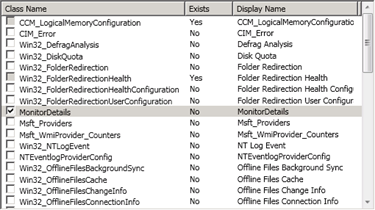
| Select the MonitorDetails class from the list and click OK.
If the MonitorDetails class is not there, then the script has not run successfully on the computer you are connecting to. Make sure you test the PowerShell script and repeat if necessary. Once the class is selected, click OK on the remaining open windows |
 |
This process tells the client to retrieve the WMI class that we just created an populated using our PowerShell script. Once this is set, it will not need to be revisited unless the client settings change or are recreated for any reason.
And there we have it.
The PowerShell script will go out and run against clients updating the WMI and as these clients report in their Hardware inventory the monitor details will appear in the resource explorer like any other hardware detail.
For many, this may enough as they will be able to report on the ConfigMgr database and get the results they are after. Others want a more thorough view of Asset Management and may want to pull this information in to their Asset management solution to show these relationships.
In my next blog post, I will go through how to use the Cireson Asset Management Solution to pull in this data, create or update a Hardware Asset item for each monitor and finally how to associate it with the computer it is plugged in to.