
The Cireson Asset Import Connector is one of the solutions contained within the Cireson Asset Management Stream of products and allows for Asset Administrators to take the guesswork out of importing external data into System Center Service Manager. This app allows any out-of-the-box CMDB data, or any information in the Cireson Asset Management app, to be imported from external CSV, SQL, ODBC or LDAP sources of truth, exposing an intuitive interface that provides the ability to map columns and schedule imports when required.
With the introduction of this app to a Service Manager environment, importing data becomes seamless. One-time imports and configuring XML files become a thing of the past. The straightforward app provides the organization with the ability to build an asset repository of information that is relevant and accurate when working with requests in Service Manager.
1. Creating a new Asset Import Connector
|
 |
||
|
|||
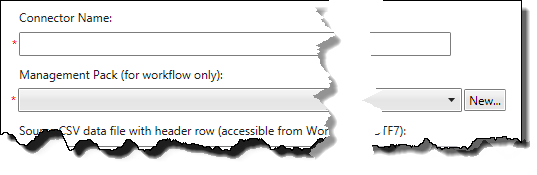
| Enter a name for the connector that will make sense to other administrators for future maintenance tasks.
Select a Management Pack (or create a new one) that will be used to contain the workflow information required for the workflow of the connector. |
 |
||
|
|||
| The next step will be different depending on the imput data source. Select and use one of the following sections below before continuing. | |||

2. Using a CSV Source
| After completing the steps in the section below, browse to the location of the .CSV file that contains the asset data to import and select the Encoding Format of the file.
The selected path can be either a local path (on the SCSM workflow server) or a network share that has read permissions by the Workflow account. The first line of the CSV file must contain the header row information for the data contained within. |
 |
||
|
|||
3. Using a SQL Source
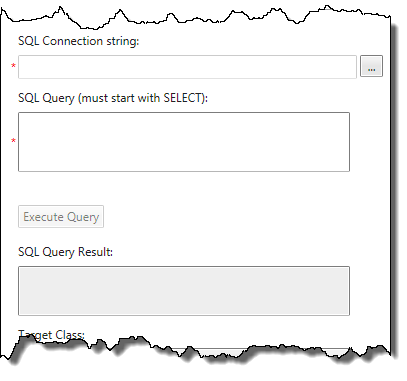
| For Microsoft SQL Server data source:
Enter the SQL Connection string by clicking the ellipse button and entering the required connection information.
Enter the SQL query that will be used to extract the data required for this connector. Click Execute Query to test the query and gather field name requirements for class property mapping. The SQL Query Results field will show the number of row returned if the query was successful. |
 |
||
| Continue the property mapping. | |||
4. Using a ODBC Source
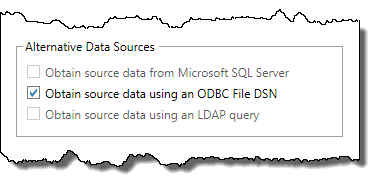
| For ODBC Server data source:
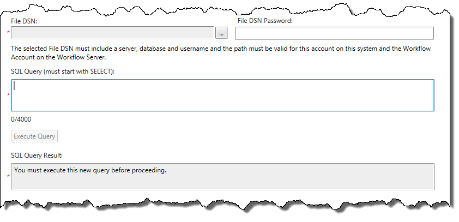
Create a File Data Source Name (DSN) that contains the Server, Database and username for the data source. Browse the file system and select the File DSN.
Enter the File DSN Password for the username within the File DSN. Enter the SQL query that will be used to extract the data required for this connector. Click Execute Query to test the query and gather field name requirements for class property mapping. The SQL Query Results field will show the number of row returned if the query was successful. |
  |
||
| Continue the property mapping. | |||
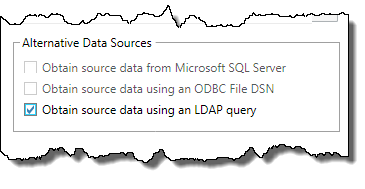
5. Using an LDAP Source
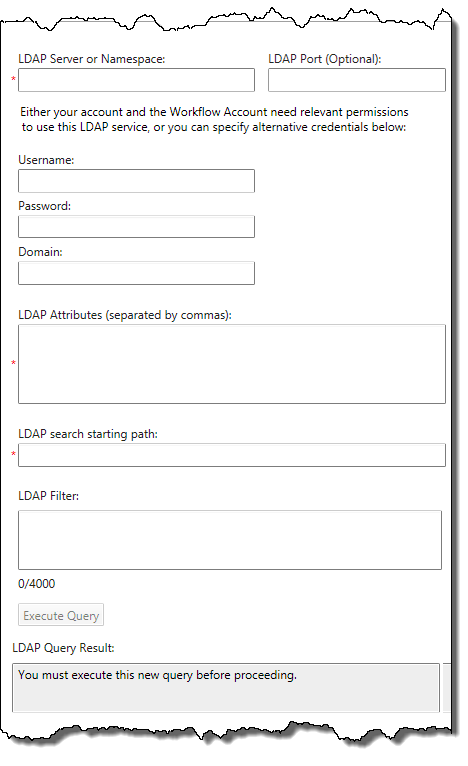
| For an LDAP data source:
Enter the LDAP Server or Namespace and the LDAP Port (If required). If the SCSM Workflow account does not have read access to the LDAP source, enter alternative credentials with the required rights. Enter the LDAP Attributes that are required to be returned separated by commas. Enter an LDAP search starting path to reduce the search scope as required. Enter any LDAP Filter needed to refine the results to the specific required data. Click Execute Query to test the query and gather field name requirements for class property mapping. The LDAP Query Result field will show the number of row returned if the query was successful. |
  |
| Continue the property mapping. | |
6. Connector Settings
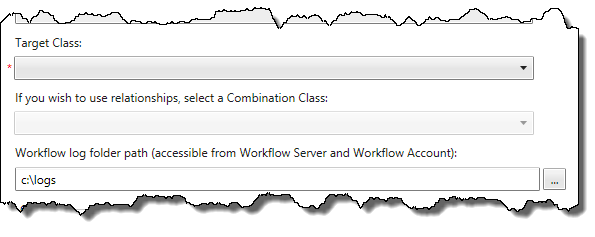
| Select the target class that the records will be imported in to. This might be one of the base classes (Such as Hardware Asset) or, if other relationships are required, selecting a combination class (Type Projection) that contains the relationships required for the import.
Enter a Workflow log path to track import results and reporting on success\failure. |
 |
||||||||||||
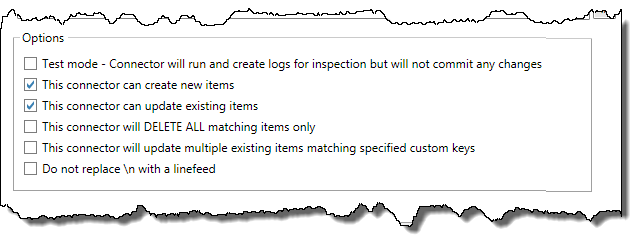
| Set the required options for the instance of the Asset Import connector. See below for more details on these options.
Once all options are selected, click Next. |
 |
||||||||||||
Asset Import Connector Options:
|
|||||||||||||
7. Mapping Fields
Data Mappings allow the mapping of the specified input data to the properties of the selected target class within SCSM.
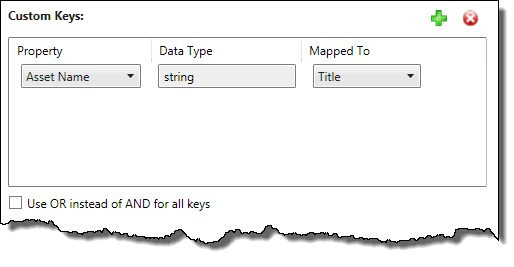
| On the Data Mapping screen, if the option for “This connector will update multiple existing items matching apecific custom keys” is selected on the previous screen the first option that will show is for Custom Keys. Custom Keys are used to fins all existing matching items and update them as normal via the mappings below. At least one custom key is required.
The Custom Key can be any of the properties for the class that was selected for this connector. Add the custom keys as required and map these to the data from the import source. |
 |
||
|
|||
| The property displayed in the left column will show all properties of the selected class, along with any extended properties that have been added for the class.
The Data Type in the middle column will show what input data type the property will expect. String (Key) identifies the primary key for the selected class. The Mapped To value displayed in the right column will show drop-down values for each available column header from the specified source The Hardware Asset ID should be mapped to the primary key selection you chose in the Asset Management Settings. (Serial Number, Asset Tag, GUID, etc.) |
|||
| Map all additional properties to the input data that is defined from the Input source.
Any properties that are mapped will be updated or entered as defined. Any properties that are not mapped will not be updated. |
 |
||
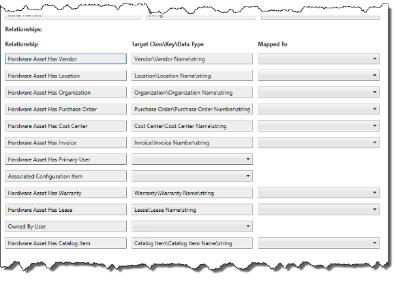
| If a Combination Class is selected for the connector there will be additional mapping fields under the Relationship heading.
These can be used to map data from multiple classes together as relationships as required. |
 |
||
| Once all mappings are complete, click Next. | |||
8. Connector Workflow Schedule
Some connectors will be run as a once off to import bulk data in to the SCSM database, whereas others might be run on a schedule to keep other data sources up-to-date within the database.
An example of a scheduled data source might be a connector in to a Mobile Device Management (MDM) solution or an accounting or purchase system (for invoices and Purchase Orders).
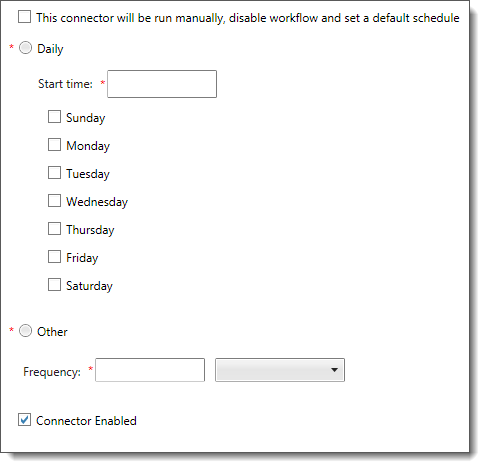
| For connectors that will be only run once, select the option marked This connector will be run manually.
When using this option, a warning message will be displayed to remind administrators that the connector will only run when using the Synchronize Now task within the console. For a reoccurring schedule, enter the frequency as either daily or as a regular reoccurrence with a set frequency. Ensure the Connector Enabled option is enabled to all ow the connector to run. This option may help with the administration of the connector at a later date if it needs to be turned off for a period of time for maintenance or fault finding. |
 |
| When the scheduling information has been entered, click Create. | |
9. Manually Running a Connector
Once a connector has been created it will show within the Connectors node in the Administration workspace of the SCSM console. Within this node, administrators are able to see the current status of all connectors, when they were last started and finished and their percentage complete.
Administrators are also able to manually run a connector to either force the synchronization regardless of workflow schedule or to trigger a non-repeating connector.
To manually run a connector:
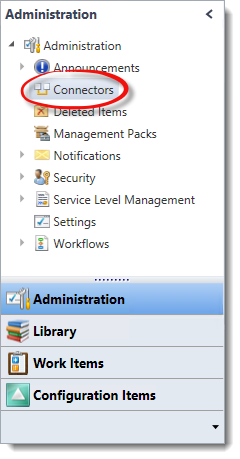
| Within the SCSM console, select the Administration workspace.
Select the Connectors node. |
 |
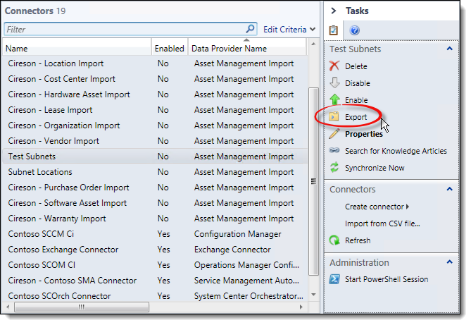
| Select the Connector to be run and click the Synchronize Now task within the tasks pane. | 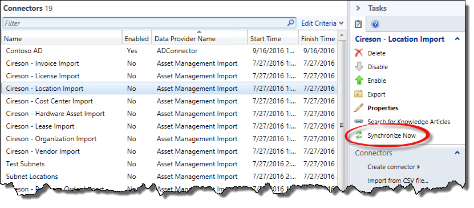 |
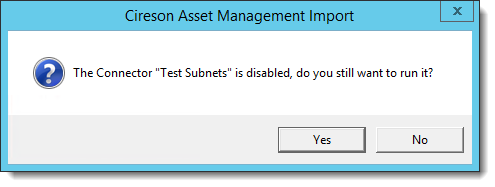
| If the connector does not have a schedule set (is disabled) then a message will appear informing that the connector is disabled and asking if it should still be run.
Click Yes to run the Synchronization. |
 |
| The connector workflow will then be scheduled to start at the next opportunity for the workflow engine. | |
10. Exporting and Importing a Connector
Once a connector has been configured the settings can be exported to allow administrators to copy the connector to a different environment (dev to prod).
To export and import a connector:
| Within the environment to export from:
Within the SCSM console, select the Administration workspace. Select the Connectors node. |
 |
| Select the Connector to be run and click the Export task within the tasks pane.
Save the connector XML file to a path and click Save. |
 |
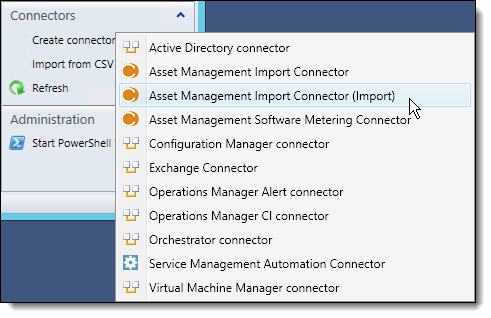
| Within the environment to import in to:
On the Connectors node, select Create Connector from the drop down menu. Select Asset Management Import Connector (Import) from the sub menu. Browse to the folder containing the exported XML file, select the xml file to import and click OK. |
 |
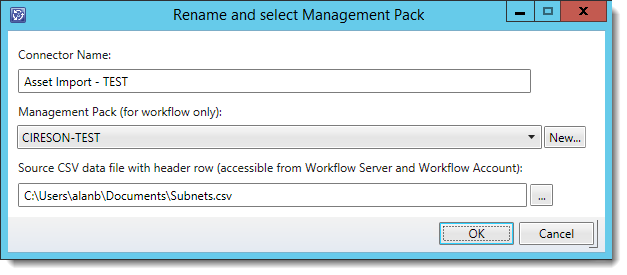
| A window will appear to rename the Connector from its original name if required and change the Management Pack that holds the information.
If the connector is importing from a CSV file, an additional field will appear that is used to provide the source location of the CSV file required. Enter the values needed and click OK. |
 |
| The connector will be imported and will now appear in the connectors node. | |
11. Deleting a Connector
If a connector is no longer needed, then it can be removed from the SCSM environment by deleting the connector from the console.
To delete a connector:
| Within the environment to export from:
Within the SCSM console, select the Administration workspace. Select the Connectors node. |
 |
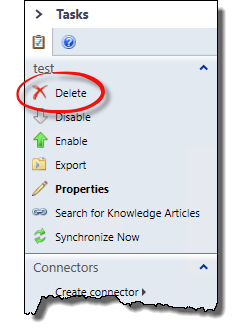
| Click the Delete task from the tasks pane on the right of the screen.
Click OK on the message that appears to confirm the connector to be deleted. The connector has previously imported data a second message will appear asking if the data that was imported from the connector should be deleted. |
 |