
At a recent meeting of the Adelaide System Center User Community and also at Cireson Innovate 2015 I did a presented on Self-Service Automation Deep Dive (https://vimeo.com/143957653) and showed several automation techniques that I have used over the years. In this series of blog posts I will explain these techniques, why they are useful and how to go about automating them in your environment. (And maybe even share a Runbook or two.)
In Part 1 we looked at taking the Affected User’s name and placing it in the title of the service request to make it easier to find when looking at a queue of work.
In Part 2 we will look at taking some basic user input text fields and placing them in the Description field of the service request.
In Part 3 we will look at taking a multi select query field and enter each of the results in the description field so they are nicely formatted.
What’s Wrong With User Input?
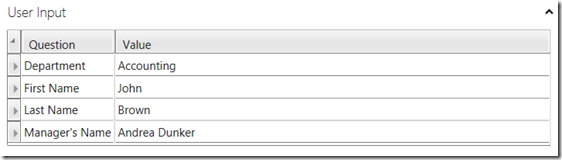
When an end user enters data in to a service request the results are recorded in properties of the associated SR or any activities that are related to that SR. To try and “Help” the analyst these values are then also displayed in the User Input section on the SR form.
With text and drop down lists the data is shown in a format that is easy to read.
Query results however are not as easy.

Not only is the select value shown but also the GUID of the item. If the query is set to allow multiple selections, like the one above, there can be multiple values all mixed together.
This is far from simple and some analysts, especially second and third level support, may never actually read this data or understand what it all means.
How Could User Input Be Used Better?
The user input data would be much more useful if it was somehow added in a nicely formatted way in the SR description or even key pieces of data in the Title.
In Part 1 we looked at the title only and in Part 2 we will cover the Description field for some basic input fields such as First Name, Last Name, Phone number etc.
Basic Fields in the Description
In this example SR a user can enter basic text fields in to the service request.
Lets Automate it!
Like before we create a new Runbook and give it a name that we will be able to find later. Remember: When in SCSM the folder structure of Orchestrator is lost so don’t rely on the folder structure to be able to find Runbooks when you need to. Add a numbering sequence at the front of the Runbook name to help with that.
Then, like all automation Runbooks, we need to start the Runbook with an Initialize Data activity that will get the Input from the SR. In this case, we will want to gather not only the SR number but whatever fields we want to bring in from the User Input also. (We technically don’t need this as we can retrieve the stored data from the SR at a later date, but it saves time in the long run.)

Add a property in the Initialize Data for the following fields:
NOTE: You can really put any fields here you want to capture from the user input or SR class. |
Select Service Request as the class for the Get Object and filter on the ID property using the subscribed SR Number from the Initialize Data activity. |
 |
 |
At this point we have all the fields we need to capture the data input by the end user for use within the Runbook.
To cut this post short I’ll not go in to mapping the User Input fields to the Runbook Automation activity, but needless to say it is exactly the same as you would do for mapping the value to an SR property.
So, assuming we now have all the User Input mapped to these properties we can then start to update the SR just like we did in Part 1 but the Description property instead of the Title. Building on the Runbook that we built in part 1 of this series we will just add the additional properties tot he Update SR Object. Just like the Title we want to take the current Description on the SR (given to us from the Get Object activity) and then update the Description field with the current value *plus* each of the properties that we captured in the Initialize activity.

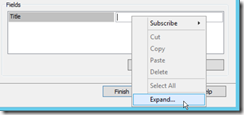
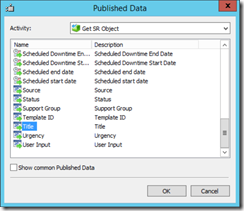
| Open the Update SR Object and add the Description property in the Fields to be updated. Right click on the text box and select Expand, to make our lived easier. | We are now going to add the Title value that we retrieved when we first ran the Get Object. This will give us the Title as it is right now. We can then add a space, a hyphen and another space to make the formatting look nice, then add the users Display Name field. |
  |
 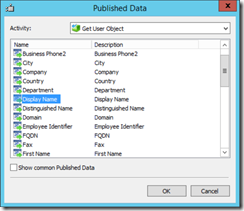 |
The updated field will now look like this:
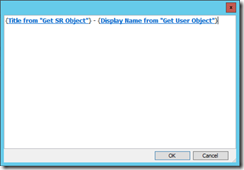
And we’re done.
To make it even easier to follow the Runbook is available Here to download.